Win11 Start Menu FeaturedCategoriesBlog

6 ways to change Windows 11 start menu

Change can be difficult, especially when it comes to your operating system. If the Windows 11 Start menu makes you miss the familiar look of Windows 10, you are not alone. Fortunately, you don’t have to settle for a layout you dislike. You can customize the Windows 11 Start menu or even replace it with a third-party alternative.

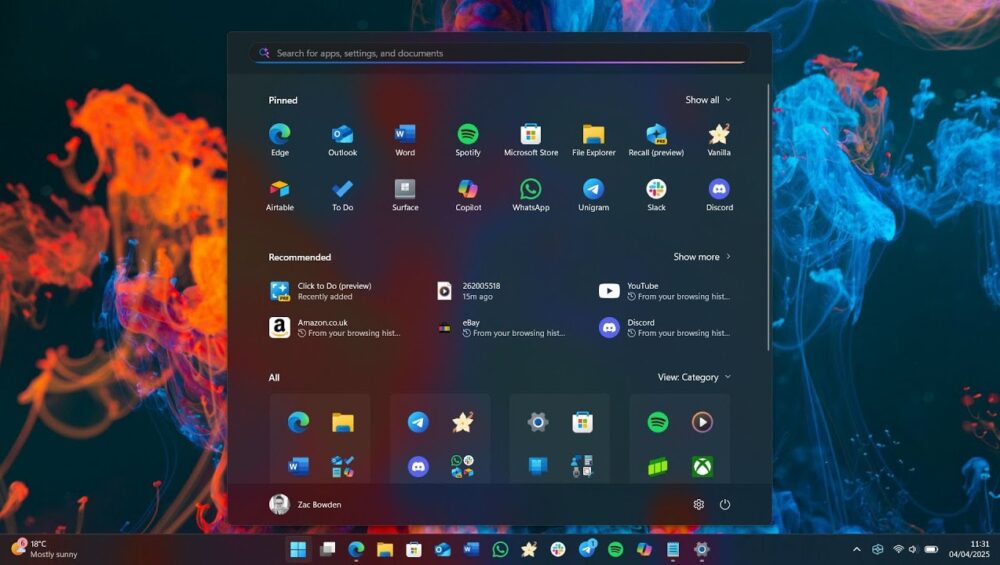
Since its release, the redesigned Windows 11 Start menu has divided users. While some appreciate its clean and modern design, many others prefer the classic Windows 10 interface. The centered layout, simplified customization options, and removal of Live Tiles have made it one of the most debated changes in Windows 11.

However, instead of simply criticizing the new design, you can take action.

Can You Customize the Windows 11 Start Menu?

Yes, you can.

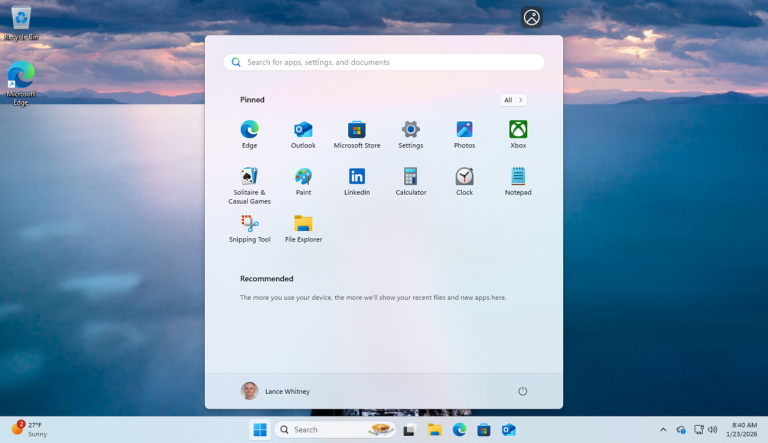
Although the Windows 11 Start menu is less flexible than the Windows 10 version, Microsoft still allows several useful adjustments. For example, you can:

  • Move the Start menu to the left side of the taskbar
  • Pin or unpin apps
  • Remove recommended files
  • Organize pinned applications
  • Adjust layout settings

These small changes can significantly improve your daily workflow and make the interface feel more familiar.

How to Replace the Windows 11 Start Menu

If customization is not enough, installing a third-party Start menu replacement is another effective solution. Several trusted tools restore the classic Windows 10 look and functionality. These applications offer:

  • Traditional Start menu layout
  • Advanced customization options
  • Classic taskbar styling
  • Improved navigation

As a result, you can enjoy the performance benefits of Windows 11 without sacrificing the interface you prefer.

Why Do Users Dislike the Windows 11 Start Menu?

Before making changes, it’s important to understand why the Windows 11 Start menu receives criticism:

  • It removes Live Tiles
  • It limits deep customization
  • It prioritizes recommended content
  • It changes long-standing navigation habits

For longtime Windows users, these differences can feel disruptive. However, once you understand the available customization options, the experience becomes much more manageable.


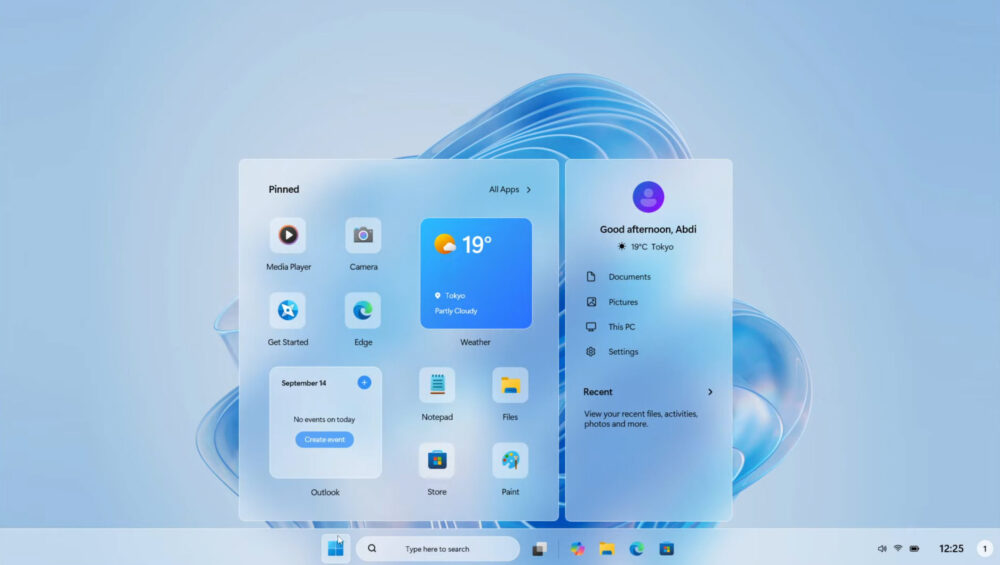
How to Edit the Windows 11 Start Menu (Step-by-Step Guide)

The ability to edit the Windows 11 Start menu has improved significantly since its original release. When Windows 11 first launched, the Start menu felt limited and overly simplified. Many users criticized the Recommended section because it displayed recently opened files and apps that not everyone wanted to see.

Additionally, viewing all installed apps required opening a separate panel, which disrupted workflow. Fortunately, Microsoft addressed these concerns. With Windows 11 version 25H2, the Start menu received meaningful updates that improve usability and customization.

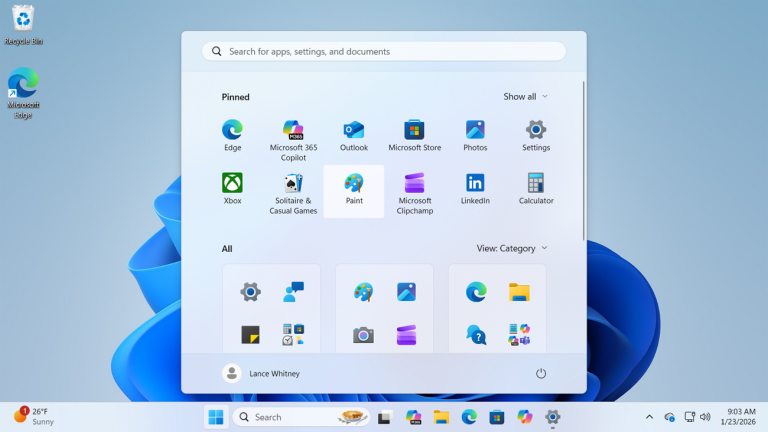
Now, all your apps are accessible from the same menu. You can also completely remove the Recommended section if you prefer a cleaner layout. Furthermore, Windows 11 can display a phone integration panel, allowing quick access to recent calls and text messages from your smartphone.

While these improvements help, you can still customize the Start menu even further.


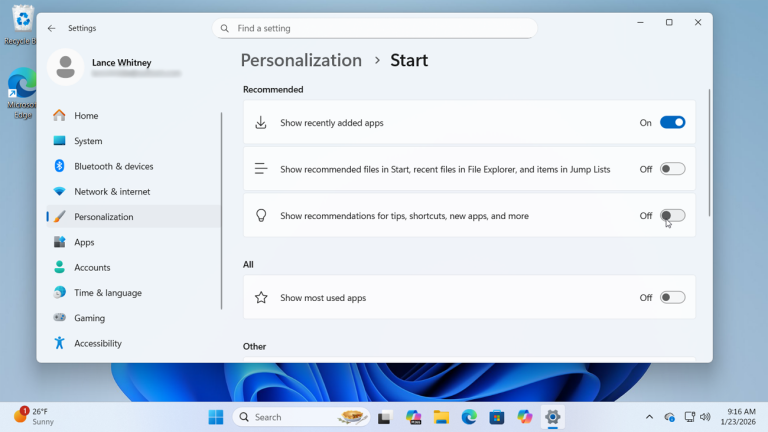
1. Remove Recommended Apps from the Windows 11 Start Menu

The Recommended section shows recently added apps, recently opened files, and suggested content. However, not everyone finds this feature useful. If you prefer a minimal and distraction-free Start menu, you can disable it entirely.

How to Remove Recommended Apps:

  1. Open Settings
  2. Go to Personalization
  3. Click Start
  4. Turn off the following options:
    • Show recommended files in Start
    • Show recent files in File Explorer and items in Jump Lists
    • Show recommendations for tips, shortcuts, new apps, and more

Once disabled, the Recommended section will disappear, giving you more space for pinned apps and a cleaner overall layout.


Editing the Windows 11 Start menu allows you to create a more productive workspace. Whether you want a minimal interface or better app organization, small adjustments can significantly improve your daily experience.


2. Pin and Unpin Apps on the Windows 11 Start Menu

Another simple way to edit the Windows 11 Start menu is by pinning and unpinning apps. This allows you to control which applications appear for quick access and remove the ones you don’t use regularly.

Customizing pinned apps helps you create a cleaner, more efficient layout that matches your workflow.

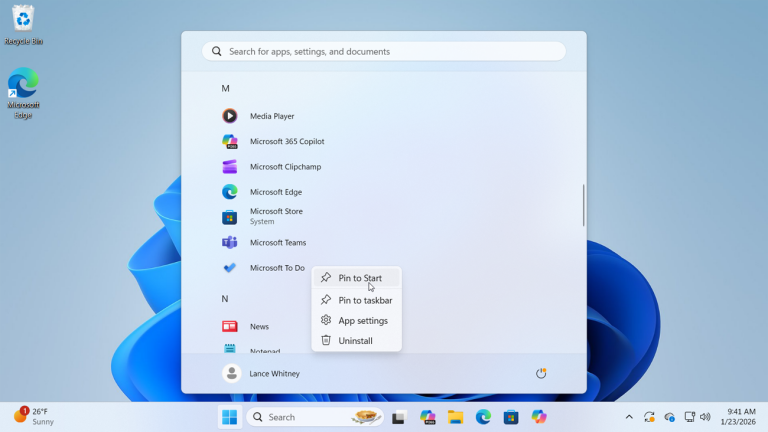
How to Pin an App to the Windows 11 Start Menu

  1. Click the Start button.
  2. Select All to view your complete list of installed apps.
  3. Find the app you want to add.
  4. Right-click the app.
  5. Choose Pin to Start.

The app will immediately appear in the pinned section of your Start menu for easy access.

How to Unpin an App from the Start Menu

If you want to remove an app from the pinned section:

  1. Open the Start menu.
  2. Right-click the app icon.
  3. Select Unpin from Start.

The app will disappear from the pinned area, but it will still remain available under the All apps list.


By managing pinned apps, you can make the Windows 11 Start menu more organized and personalized. Small adjustments like this can significantly improve navigation and productivity.


3. Move Icons Around the Windows 11 Start Menu

Another effective way to edit the Windows 11 Start menu is by rearranging app icons. Organizing your pinned apps based on usage makes navigation faster and improves productivity.

For example, you may want to place your most frequently used apps at the top of the Start menu and move less important ones toward the bottom. This simple adjustment helps you access essential programs more efficiently.

How to Move Apps in the Windows 11 Start Menu

There are several ways to reposition apps:

  • Move an app to the top:
    Right-click the app and select Move to front.
  • Reposition left or right:
    Right-click the app and choose the appropriate directional option.
  • Drag and drop:
    Click and hold the app icon, then drag it to your preferred location.

Using drag-and-drop is often the fastest and most flexible method for customizing layout placement.


Reorganizing your pinned apps allows you to personalize the Windows 11 Start menu and create a layout that fits your daily workflow. Small layout adjustments can make a noticeable difference in usability and efficiency.


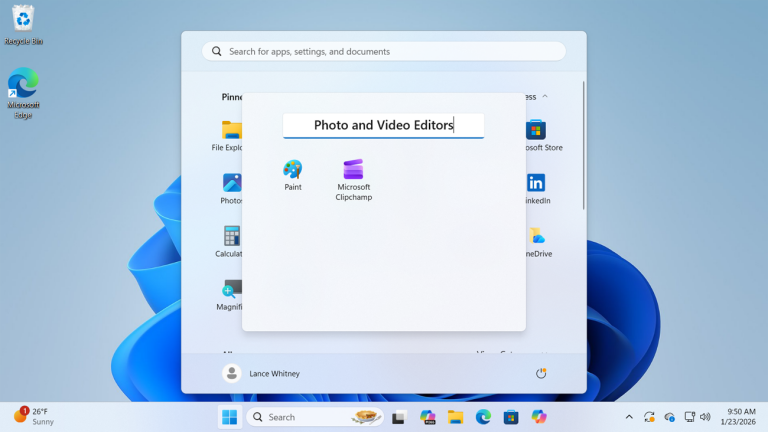
4. Create Folders in the Windows 11 Start Menu

If you want to edit the Windows 11 Start menu for better organization, creating folders is one of the most useful features available. Start menu folders help reduce clutter and group similar apps together, making navigation faster and more efficient.

For example, you can create folders for work apps, gaming tools, productivity software, or social media applications.

How to Create a Folder in the Windows 11 Start Menu

Follow these simple steps:

  1. Open the Start menu.
  2. Click and hold one app icon.
  3. Drag it on top of another app icon.
  4. Release to automatically create a folder.

Windows 11 will instantly place both apps inside a new folder labeled “Folder.”

How to Rename a Start Menu Folder

To personalize your folder:

  1. Click the folder to open it.
  2. Select the default name field.
  3. Enter a custom name that matches your app group (for example, “Work,” “Games,” or “Utilities”).

You can continue adding more apps by dragging and dropping them into the folder at any time.


Using folders is one of the best ways to customize and organize the Windows 11 Start menu. With proper grouping, you can improve workflow, reduce clutter, and make your system easier to navigate.


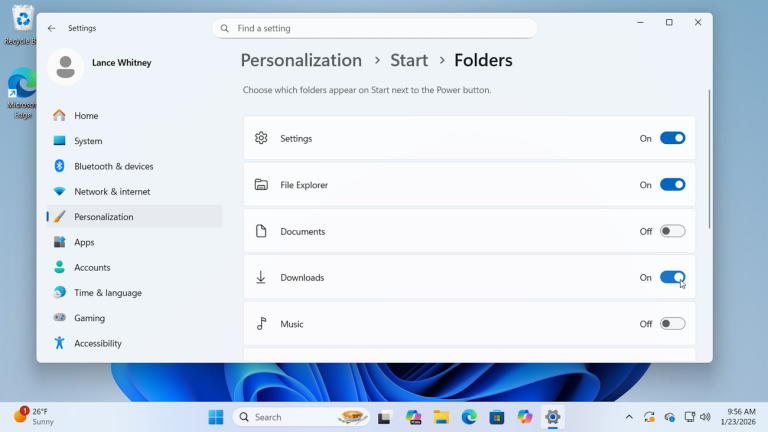
5. Add System Folders to the Bottom of the Windows 11 Start Menu

Another useful way to edit the Windows 11 Start menu is by adding system folders next to the Power button. This feature gives you instant access to important locations such as Settings, File Explorer, Documents, Downloads, Network, and more—without opening additional menus.

Placing these shortcuts at the bottom of the Start menu improves navigation speed and makes everyday tasks more convenient.

How to Add Folders Next to the Power Button

Follow these steps to customize the bottom section of your Start menu:

  1. Open Settings
  2. Go to Personalization
  3. Click Start
  4. Select Folders
  5. Turn on the toggle switch for any folder you want to appear next to the Power icon

Once enabled, the selected folders will immediately appear in the lower-right corner of the Start menu.


Adding system folders is a simple yet powerful way to customize the Windows 11 Start menu. With quick access to essential tools and locations, you can streamline your workflow and make your PC more efficient.


6. Realign the Start Button in Windows 11

When Microsoft introduced Windows 11, the Start button was moved to the center of the taskbar. While some users enjoy the modern layout, others prefer the traditional bottom-left alignment found in previous versions of Windows.

If you want to edit the Windows 11 Start menu and restore the classic layout, you can easily move the Start button back to the left side.

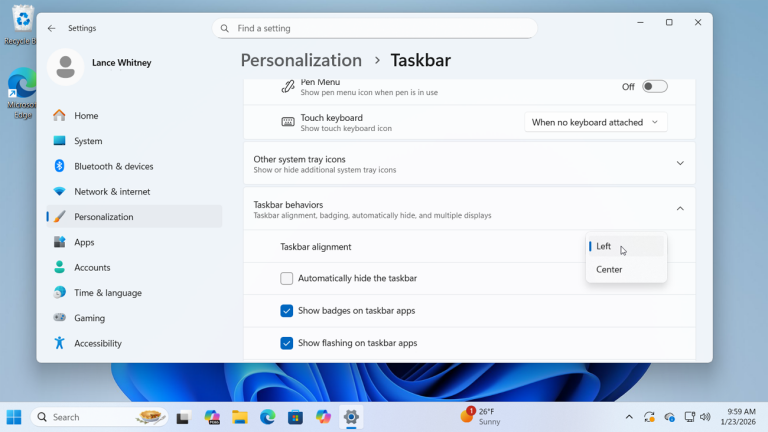
How to Move the Start Button to the Left

Follow these steps:

  1. Open Settings
  2. Go to Personalization
  3. Click Taskbar
  4. Select Taskbar behaviors
  5. Find the Taskbar alignment dropdown menu
  6. Change the alignment from Center to Left

Your Start button and taskbar icons will instantly shift to the left side of the screen.


Realigning the Start button is one of the quickest ways to make Windows 11 feel more familiar. If you want even more control, you can further customize taskbar settings to match your preferred layout and workflow.

Windows 11 on Old PC Without TPM - optkeysCategoriesBlog

Windows 11 on Old PC Without TPM

If you want to install Windows 11 on old PC hardware, you may see the error “This PC can’t run Windows 11.” This happens because of strict hardware checks like TPM 2.0 and CPU support. However, there is a simple method that allows you to install Windows 11 on old PC systems without upgrading hardware.Install Windows 11 on old PC without TPM. Use this simple trick to bypass hardware requirements and set up a bootable USB.


Windows 11 Hardware Requirements (Official)

According to Windows 11 requirements, your PC must have:

  • 1 GHz or faster processor with 2+ cores
  • 4 GB RAM
  • 64 GB storage
  • TPM 2.0
  • UEFI with Secure Boot

Older systems usually fail because of TPM or unsupported CPUs.

However, you can bypass these checks using the method below.


What You Need Before You Start

Before installing Windows 11 on an old PC, download the following tools:

  • 7-Zip (Free file extractor)
  • ImgBurn (Portable version recommended)
  • Windows 10 ISO file
  • Windows 11 ISO file

You can download official ISO files from Microsoft’s website.


How to Install Windows 11 on Unsupported Hardware

Follow these steps carefully.


Step 1: Extract Both ISO Files

First, right-click each ISO file.

Then extract them using 7-Zip.

After extraction:

  • Rename the Windows 10 folder to W10
  • Rename the Windows 11 folder to W11

This makes the process easier.


Step 2: Replace the install.wim File

Next, open the folder:

W11 → sources

Copy the file named:

install.wim

Now go to:

W10 → sources

Paste the file there and replace the existing install.wim file.

This step allows the Windows 10 installer to load Windows 11 files without performing strict hardware checks.


Step 3: Create a New ISO Image

Now you must build a new ISO file.

Open the portable version of ImgBurn.

Select:

Create image file from files/folders

Then:

  1. Choose the W10 folder as the source
  2. Select a destination folder and name the new ISO file
  3. Click the Advanced tab
  4. Choose Bootable Disc
  5. Check Make Image Bootable
  6. Select the file etfsboot.com inside the W10\boot folder
  7. Set the value to 8
  8. Click Build

Wait until the ISO file is created.


Create a Windows 11 Bootable USB

After the ISO is ready, create a bootable USB drive.

You can use ImgBurn

Insert a USB drive (8 GB or larger).

Then flash the new ISO file to the USB drive.

Now you have a Windows 11 bootable USB that works on many unsupported PCs.


Important Notes

  • This method bypasses TPM and CPU checks.
  • Updates may not always be guaranteed.
  • Performance depends on your hardware.

However, many users report that Windows 11 runs smoothly even on older systems.

Update Fixer Featured-OPTKeysCategoriesBlog

Fix Windows Update Errors (Free Tool)


Windows Update Fixer is the fastest way to repair Windows Update errors and restore proper update functionality. If your computer is stuck downloading updates, showing error codes like 0x80070002, or failing to install updates, this Windows Update Fixer guide will help you resolve the problem safely and effectively. Keeping Windows updated is essential for security, stability, and performance.

What Is Windows Update Fixer?

Windows Update Fixer is a repair solution designed to reset Windows Update components, clear corrupted update cache files, and restart essential services. When Windows updates fail, the issue is usually caused by damaged system files, interrupted downloads, or corrupted update folders.

Using a Windows Update Fixer tool helps you:

  • Reset Windows Update services
  • Repair corrupted update components
  • Clear the SoftwareDistribution cache
  • Fix common Windows Update error codes

If you’re experiencing performance issues, you may also want to check our guide on fixing slow Windows performance (internal link example).


Common Errors Fixed by Windows Update Fixer

Windows Update Fixer resolves many common update problems, including:

  • Windows Update error 0x80070002
  • Windows Update error 0x80070057
  • Windows Update stuck at 0% or 100%
  • Windows Update installation failed
  • Windows Update service not running

These problems can prevent important security patches from installing, leaving your system vulnerable.

For more Windows troubleshooting tutorials, see our Windows repair guides section (internal link example).


How to Use Windows Update Fixer (Step-by-Step Guide)

Follow this Windows Update Fixer method carefully.

Step 1: Download Windows Update Fixer

  • Visit the official Windows Update Fixer website.
  • Download the latest version compatible with Windows 10 or Windows 11.
  • Save the file to your Desktop.

Click here to download portable Update Fixer


Step 2: Run Windows Update Fixer as Administrator

  • Right-click the downloaded file.
  • Select Run as Administrator.
  • Click Yes if prompted by User Account Control.

Running Windows Update Fixer with administrator privileges ensures all update services can be reset correctly.

Update Fixer
Update Fixer

Step 3: Start the Windows Update Fixer Repair Process

  • Click Scan or Fix Now.
  • The Windows Update Fixer will:
    • Stop update services
    • Clear update cache
    • Reset Windows Update components
    • Restart services

Wait for the repair process to complete.


Step 4: Restart and Check for Updates

  • Restart your computer.
  • Open Settings → Windows Update.
  • Click Check for Updates.

Your Windows Update system should now function normally.


Manual Windows Update Fixer Method (Advanced)

If you prefer a manual Windows Update Fixer approach, follow these steps:

Open Command Prompt as Administrator and run:

net stop wuauserv
net stop cryptSvc
net stop bits
net stop msiserver

Rename update folders:

ren C:\Windows\SoftwareDistribution SoftwareDistribution.old
ren C:\Windows\System32\catroot2 catroot2.old

Restart services:

net start wuauserv
net start cryptSvc
net start bits
net start msiserver

Restart your PC and check for updates again.


Why Windows Update Fixer Is Important

Using Windows Update Fixer ensures:

  • Security patches install correctly
  • System stability improves
  • Performance issues caused by failed updates are resolved
  • Update errors no longer interrupt your workflow

Regular maintenance prevents recurring update failures.


Tips to Prevent Future Windows Update Errors

To avoid needing Windows Update Fixer frequently:

  • Keep at least 20GB free disk space
  • Avoid interrupting updates
  • Keep drivers updated
  • Use genuine Windows versions
  • Run regular malware scans

You can also read our complete Windows maintenance checklist (internal link example).


Frequently Asked Questions About Windows Update Fixer

Is Windows Update Fixer safe?

Yes. Windows Update Fixer resets update components without deleting personal files.

Does Windows Update Fixer work on Windows 10 and 11?

Yes. Most versions support both operating systems.

Will Windows Update Fixer delete my files?

No. It only repairs update-related components.

Windows errors fix-OPTKeysCategoriesBlog

Windows 10 and 11 Common Errors and How to Fix Them

Windows activation errors and fixes are among the most common troubleshooting searches for users of Windows 10 and Windows 11. If you see messages like “Windows is not activated” or receive an activation error code, this guide explains the most common problems and how to fix them step by step.

Activation issues usually appear after reinstalling Windows, changing hardware, or entering an incorrect product key. Fortunately, most activation problems can be resolved quickly.


Windows Activation Errors and Fixes Explained

Before fixing anything, it’s important to understand why Windows activation errors happen.

Common causes include:

  • Invalid or incorrect product key
  • Installing the wrong Windows edition (Home vs Pro)
  • Major hardware changes (especially motherboard replacement)
  • Internet connection issues
  • Corrupted system files

Understanding the cause makes applying the correct fix much easier.


Most Common Windows Activation Errors and Fixes in Windows 10 and Windows 11

Below are the most frequent activation issues and their solutions.


Windows Activation Errors and Fixes for Error Code 0xC004F050

This error usually means the product key is invalid or does not match your installed Windows edition.

How to fix it:

  1. Open Settings
  2. Go to Update & Security → Activation
  3. Click Change product key
  4. Enter a valid key that matches your Windows version
  5. Run the Activation Troubleshooter

Make sure:

  • Windows 10 Home uses a Home key
  • Windows 11 Pro uses a Pro key

Using the wrong edition key is one of the main causes of Windows activation errors.


Windows Activation Errors and Fixes for Error Code 0x803F7001

This error appears when Windows cannot find a valid license for your device.

It often happens after reinstalling Windows without linking your license to your Microsoft account.

Fix:

  1. Connect to the internet
  2. Go to Settings → Activation
  3. Click Troubleshoot
  4. Select “I changed hardware on this device recently” (if applicable)
  5. Sign in with your Microsoft account

If no license is found, you may need a valid activation key.


Windows Activation Errors and Fixes for the “Windows Not Activated” Message

If you see the “Activate Windows” watermark in the corner of your screen, your system is not properly activated.

Common reasons include:

  • The product key was already used on another device
  • Hardware changes invalidated the digital license
  • The key entered does not match the installed edition

Running the Activation Troubleshooter solves this in many cases. If not, entering a genuine product key is the permanent solution.


Advanced Windows Activation Errors and Fixes Troubleshooting Methods

Some Windows activation errors and fixes require deeper system checks.


Using the Troubleshooter for Windows Activation Errors and Fixes

The built-in troubleshooter automatically detects licensing issues.

To run it:

  1. Open Settings
  2. Go to Activation
  3. Click Troubleshoot
  4. Follow on-screen instructions

This tool resolves most digital license problems automatically.


Fixing System Corruption Behind Windows Activation Errors and Fixes

Corrupted system files can block activation.

To repair them:

  1. Open Command Prompt as Administrator
  2. Type:
sfc /scannow
  1. Wait for the scan to complete
  2. Restart your PC

After restarting, try activating Windows again.


How to Prevent Windows Activation Errors and Fixes in the Future

Preventing activation issues is easier than fixing them.

Follow these best practices:

  • Always use a genuine product key
  • Match your key to the correct Windows edition
  • Link your license to your Microsoft account
  • Avoid unofficial activation tools
  • Keep your system updated

A properly activated Windows installation improves security, stability, and access to updates.


Windows Activation Differences Between Windows 10 and Windows 11

Both Windows 10 and Windows 11 use similar activation systems, but Windows 11 also requires:

  • TPM 2.0
  • Secure Boot enabled
  • Compatible hardware

If activation fails on Windows 11, check your BIOS settings to ensure TPM and Secure Boot are enabled.

Windows-11-Wallpaper1-OPTKEYSCategoriesBlog

Fix Windows 11 Activation Errors – 2026 Guide

Windows 11 activation errors are one of the most common issues users face after installing or upgrading their system. Whether you see messages like “Windows is not activated,” “Invalid product key,” or “Activation server unavailable,” these problems can stop you from fully using your PC.

This 2026 complete guide explains why Windows 11 activation fails, the most common error codes, and step-by-step solutions that actually work. Follow this guide carefully and you’ll have Windows 11 activated properly in no time.


Why Windows 11 Activation Errors Happen

Windows 11 activation issues usually occur for one of the following reasons:

  • Using an invalid, blocked, or already-used product key
  • Major hardware changes (motherboard, CPU, SSD)
  • Upgrading from a non-activated Windows version
  • Internet or Microsoft activation server issues
  • Windows edition mismatch (Home vs Pro)
  • Installing Windows without a valid digital license

Understanding the cause helps you apply the correct fix, instead of wasting time on random solutions.


Most Common Windows 11 Activation Error Codes

Here are the most frequent errors users encounter in 2026:

  • 0xC004C003 – Product key blocked or already used
  • 0x803FA067 – Invalid or incompatible key
  • 0xC004F213 – No product key found
  • 0xC004F050 – Invalid product key
  • 0x8007232B – Activation server or DNS issue

If your error code matches one of these, don’t worry, solutions are below.


Step-by-Step Fixes for Windows 11 Activation Errors

1. Check Your Windows 11 Edition

Make sure your product key matches your installed edition.

Steps:

  1. Open Settings
  2. Go to System → About
  3. Check Windows edition

A Windows 11 Pro key will NOT activate Windows 11 Home, and vice versa.


2. Activate Windows 11 Using Settings

Sometimes activation simply needs to be refreshed.

  1. Go to Settings → System → Activation
  2. Click Activate
  3. Sign in with your Microsoft account (if applicable)

If activation fails, continue to the next step.


3. Change or Re-Enter Your Product Key

If the key was entered incorrectly or activation failed earlier:

  1. Open Settings → Activation
  2. Click Change product key
  3. Enter a valid 25-character key
  4. Confirm and restart your PC

Tip: Always copy-paste the key carefully to avoid typing errors.


4. Use the Activation Troubleshooter

Windows 11 includes a built-in activation troubleshooter.

  1. Go to Settings → Activation
  2. Click Troubleshoot
  3. Select I changed hardware on this device recently (if applicable)
  4. Sign in to your Microsoft account

This is especially useful after hardware upgrades.


5. Activate Windows 11 via Command Prompt (Advanced)

If Settings fails, try activating manually.

  1. Open Command Prompt as Administrator
  2. Run these commands one by one:
slmgr /ipk YOUR-PRODUCT-KEY
slmgr /ato

Restart your PC and check activation status again.


6. Fix Internet and Server-Related Issues

Activation requires a stable connection.

  • Disable VPNs and proxies
  • Check date and time settings
  • Try a different network
  • Temporarily disable firewall/antivirus

Microsoft activation servers may also be temporarily down—wait and retry later.


7. Upgrade From Windows 10 (If Eligible)

If your device previously had an activated Windows 10 license:

  1. Install Windows 11 on the same hardware
  2. Sign in with the same Microsoft account
  3. Activation should occur automatically via digital license

How to Avoid Windows 11 Activation Problems

  • Always buy genuine Windows licenses
  • Match the correct edition
  • Avoid reused or leaked keys
  • Link your license to a Microsoft account
  • Keep proof of purchase

These steps prevent future activation errors after reinstalls or upgrades.

Windows 11 Bypass Featured -OPTKEYSCategoriesBlog

Bypass Windows 11 System Requirements

This guide explains how to bypass Windows 11 system requirements and install Windows 11 on unsupported hardware. Follow each step carefully to avoid installation issues.


Step 1: Check Your Current System

Before you start, confirm which requirements block your upgrade. Most systems fail due to:

  • Unsupported CPU
  • Missing TPM 2.0
  • Secure Boot disabled

You can check this using Microsoft’s PC Health Check tool or system settings.


Step 2: Download the Official Windows 11 ISO

Instead of upgrading through Windows Update, download the official Windows 11 ISO directly from Microsoft.
Using the ISO gives you more control and avoids automatic compatibility blocks.


Step 3: Create a Bootable USB Drive

Next, create a bootable USB using a trusted tool. This allows you to start the installation manually rather than relying on Windows Update checks.

Make sure the USB:

  • Uses GPT partition style
  • Supports UEFI boot mode
  • Contains the Windows 11 ISO

Step 4: Bypass Hardware Checks During Installation

During setup, Windows checks for TPM, Secure Boot, and CPU compatibility.
At this stage, you can bypass these checks by adjusting installation settings before continuing.

This step allows the installer to proceed even if your hardware does not meet official requirements.


Step 5: Complete the Windows 11 Installation

After bypassing the checks, continue with the installation as usual.
Follow on-screen instructions to select your drive, region, and user settings.

Once finished, Windows 11 should boot normally on your unsupported system.


Step 6: Install Drivers and Updates

After installation:

  • Install the latest chipset and graphics drivers
  • Run Windows Update to apply available security patches

Although Microsoft may limit future updates, many systems still receive regular fixes.

Microsoft-Office-Featured-OPTKEYSCategoriesBlog

Download Microsoft Software ISO Files

Downloading Microsoft software ISO files is the safest and most reliable way to install or reinstall Windows and other Microsoft products. Whether you are upgrading your PC, performing a clean installation, or creating a bootable USB, official ISO downloads ensure system stability, security, and full compatibility.

In this guide, you’ll learn what Microsoft ISO files are, why you should always use official sources, and how to download Microsoft software ISOs safely.


What Are Microsoft Software ISO Files?

A Microsoft ISO file is a complete digital copy of installation media for products like Windows 11, Windows 10, and Microsoft Office. These files allow users to:

  • Install Windows on a new or existing PC
  • Reinstall Windows after system failure
  • Upgrade to a newer Windows version
  • Create bootable USB or DVD installation media

Because ISO files contain original system files, they are commonly used by IT professionals, gamers, and advanced users.


Why Download Official Microsoft ISO Images?

Using official ISO files from Microsoft is essential. Unofficial or modified ISOs often contain malware, missing updates, or altered system files.

Benefits of official Microsoft ISO downloads:

  • ✅ Virus-free and secure
  • ✅ Original, unmodified system files
  • ✅ Compatible with genuine product keys
  • ✅ Full access to updates and features

As a result, downloading official ISO images protects your data and ensures long-term system reliability.


Available Microsoft Software ISO Downloads

Microsoft provides ISO files for several popular products, including:

Each ISO supports clean installation, upgrades, and recovery scenarios.


How to Download Microsoft Software ISO Files

Downloading Microsoft ISO files is simple if you follow the correct steps:

  1. Visit the official Microsoft download page
  2. Select the desired software version
  3. Choose your language and edition
  4. Download the ISO file directly

Alternatively, Microsoft also offers tools such as the Media Creation Tool, which can automatically create a bootable USB or download the ISO for you.


System Requirements Before Installation

Before installing Windows using an ISO file, make sure your PC meets the minimum requirements:

  • Compatible CPU (64-bit recommended)
  • At least 4 GB RAM (8 GB recommended)
  • Sufficient storage space (64 GB or more)
  • Stable internet connection for updates

Meeting these requirements ensures a smooth installation experience.


Common Issues When Using ISO Files (And How to Fix Them)

Although ISO installations are reliable, some users face common issues:

  • Installation fails → Verify ISO integrity and re-download
  • Wrong Windows edition → Match ISO edition with your product key
  • Bootable USB not detected → Recreate USB using official tools
  • Activation problems → Activate Windows after installation via Settings

Fortunately, most problems are easy to fix by using the correct ISO and installation method.

Convert Windows Evaluation to Full Version - OPTKEYSCategoriesBlog

Convert Windows Evaluation to Full Version

Windows Evaluation editions are intended for temporary testing purposes. However, once the evaluation period ends, limitations begin to appear. As a result, users often look for a way to convert Windows Evaluation to a full version and continue using the system without interruptions.

Fortunately, in some cases, conversion is possible without reinstalling Windows. In this guide, you’ll learn when conversion is supported, how to do it correctly, and what to do when conversion is not available.


What Is Windows Evaluation?

In simple terms, Windows Evaluation is a time-limited edition provided by Microsoft for testing and deployment. Typically, these editions are used by IT professionals, businesses, and developers. However, once the trial expires, Windows will display warnings and restrict functionality.

Therefore, converting to a full version becomes necessary for continued use.


Can Windows Evaluation Be Converted to a Full Version?

The short answer is: sometimes.

More specifically, conversion depends on the Windows edition you are using. While some Evaluation editions support in-place conversion, others require a clean installation.

Because of this, it’s important to identify your current edition before proceeding.


Supported Conversion Paths

Below is a clear overview of what can and cannot be converted:

Evaluation EditionConvertibleNotes
Windows Server EvaluationYesSupported via edition change
Windows 10 Enterprise EvaluationNoClean install required
Windows 11 Enterprise EvaluationNoClean install required
Windows Enterprise LTSC EvalNoConversion not supported

As shown above, client Enterprise Evaluation editions cannot be converted directly.


How to Check Your Current Windows Edition

Before moving forward, you should confirm which Windows edition is installed.

  1. Press Win + R
  2. Type winver
  3. Press Enter

At this point, Windows will display the exact edition and whether it is an Evaluation version.


Convert Windows Server Evaluation to Full Version

If you are using Windows Server Evaluation, conversion is officially supported. Therefore, this is the recommended approach.

Step-by-Step Conversion Process

  1. Open Command Prompt as Administrator
  2. First, check available target editions:
DISM /online /Get-TargetEditions
  1. Next, run the conversion command (example shown below):
DISM /online /Set-Edition:ServerDatacenter /ProductKey:XXXXX-XXXXX-XXXXX-XXXXX-XXXXX /AcceptEula
  1. Finally, restart the system when prompted

After rebooting, Windows Server will be converted to a full version.


Activate Windows After Conversion

Once the conversion is complete, activation is required.

  1. Open Settings → System → Activation
  2. Enter your valid product key
  3. Confirm activation status

As a result, the system should display Windows is activated.


When Conversion Is Not Supported

Unfortunately, Windows 10 and Windows 11 Enterprise Evaluation editions cannot be converted directly.

In this case, the only supported solution is a clean installation.

Available Options

OptionSupported
Clean install Windows ProYes
Clean install full EnterpriseYes
Direct activation of EvaluationNo
Bypass methodsNot recommended

Therefore, backing up your data before reinstalling is strongly advised.


Common Errors and Solutions

Even so, users may encounter issues during conversion or activation.

IssueCauseSolution
Product key rejectedEvaluation editionConvert edition first
DISM errorUnsupported editionVerify target edition
Activation failedInvalid keyConfirm key type
Evaluation expiredTime limit reachedConvert or reinstall

In most cases, these issues are caused by using an unsupported upgrade path.


Best Practices Before Converting

To avoid problems, follow these recommendations:

  • Back up important data
  • Use a genuine product key
  • Confirm supported conversion path
  • Maintain a stable internet connection
  • Restart after conversion

By doing so, you reduce the risk of errors significantly.

word-background-office-2019-optkeysCategoriesBlog

Office 2019 Professional Plus Online Activation Guide

Microsoft Office 2019 Professional Plus does not use the cloud-based subscription model of Microsoft 365. Instead, it’s a one-time purchase, and activation must be done with a valid product key.


What You Need Before You Start

RequirementWhat It Means
Office 2019 Professional Plus installedOffice apps must be installed on your device.
Internet connectionOnline activation contacts Microsoft servers.
Valid 25-character product keyBought from Microsoft or an authorized seller.
Microsoft Account (optional)Helpful if you want to tie the license to your account.

Step-by-Step Online Activation

1. Open Any Office App

Start any Office application, for example:

  • Word
  • Excel
  • PowerPoint

You’ll see an activation prompt if the product isn’t already activated.

2. Sign In (Optional but Recommended)

If you have a Microsoft Account associated with your Office purchase:

  1. Click Sign In.
  2. Use the email and password tied to your license.

This links the activation to your Microsoft Account.

3. Enter Your Product Key

If you’re not prompted to sign in:

  1. Go to File → Account (or Office Account).
  2. Look for Activate Product or Change Product Key.
  3. Enter your valid 25-character product key.

The key looks like:

XXXXX-XXXXX-XXXXX-XXXXX-XXXXX
  1. Click Activate.

4. Let Office Contact the Server

Office will connect to Microsoft’s activation server.
As long as the key is valid and not used on more devices than allowed, it will activate.


Activation Status and Troubleshooting

Check Activation

In any Office app:

  1. Go to File → Account.
  2. Under Product Information, you should see:
    • Product Activated
    • Or Activated with a Microsoft account

If it still says Activation Required or Unlicensed Product, proceed to the troubleshooting steps below.


Common Activation Issues & Fixes

IssueCauseHow to Fix
Invalid product keyKey typed incorrectly or wrong editionRe-enter carefully; ensure you purchased the correct Office 2019 edition
Activation limit reachedKey used on too many devicesDeactivate on old device first or contact Microsoft support
No internet connectionCannot reach activation serversConnect to the internet and retry
Error codes (e.g., 0xC004F074)Microsoft server issues or firewall blockTurn off firewall temporarily and retry; contact Microsoft support if persistent

Activate via Command Prompt (Advanced)

If normal activation fails, you can use the Office Software Protection Platform to force online activation (legitimate method):

  1. Open Command Prompt as Administrator
  2. Navigate to Office installation folder, e.g.: cd "C:\Program Files\Microsoft Office\Office16"
  3. Convert the key (replace with your key): cscript ospp.vbs /inpkey:YOUR-KEY-HERE
  4. Activate Office online: cscript ospp.vbs /act

You should see a success message if activation worked.


Associate Your License with a Microsoft Account (Optional)

Linking your Office license to a Microsoft account helps with future reinstallations.

  1. Sign in at https://account.microsoft.com
  2. Go to Services & subscriptions
  3. You should see Office 2019 Professional Plus listed if the key was redeemed
  4. This lets you manage installations and reinstall if needed.

Activate Windows Server 2019 Standard – Step-by-Step Guide - optkeysCategoriesBlog

Activate Windows Server 2019 Standard – Step-by-Step Guide

Activating Windows Server 2019 Standard ensures full system functionality, long-term stability, and continued security updates. First, activation confirms that Microsoft recognizes your server as properly licensed. Without activation, Windows Server displays warnings, restricts features, and increases compliance risks.

Therefore, system administrators and businesses must activate Windows Server 2019 Standard correctly. In this guide, you will learn several reliable activation methods. Additionally, the guide explains common activation errors and shows you how to fix them quickly.


Why You Should Activate Windows Server 2019 Standard

To begin, activation proves that your copy of Windows Server is genuine. As a result, the system unlocks all server roles and features. Moreover, activation allows your server to receive critical security and performance updates from Microsoft.

In addition, activation helps your organization remain compliant with licensing policies. Consequently, you avoid legal and operational risks.

Activation provides the following benefits:

  • Unlocks all Windows Server roles and features
  • Enables regular security and stability updates
  • Ensures licensing compliance
  • Removes activation warnings and notifications

In contrast, running an unactivated server can reduce reliability and expose your system to security risks.


What You Need Before Activation

Before you start, verify that your server meets the activation requirements. Otherwise, the activation process may fail.

RequirementDetails
Valid Product KeyMust match Windows Server 2019 Standard
Internet ConnectionRequired for online activation
Administrator AccountNeeded to apply system changes
Correct Edition InstalledMust be Server 2019 Standard

⚠️ Important: Windows Server Datacenter or Essentials keys will not activate the Standard edition.


Method 1: Activate Windows Server 2019 Standard Using Settings

First, press Windows + I to open Settings.
Next, click Update & Security, and then select Activation.
After that, choose Change product key and enter your Windows Server 2019 Standard product key.

Once you enter the key, click Next, and then click Activate.
Finally, restart the server if Windows requests it.

If activation succeeds, Windows displays a confirmation message.


Method 2: Activate Windows Server 2019 Standard Using Command Prompt

Alternatively, you can activate Windows Server 2019 Standard through the Command Prompt. This method works especially well for remote servers and VPS environments.

To begin, open Command Prompt as Administrator.
Then, install your product key by running:

slmgr /ipk XXXXX-XXXXX-XXXXX-XXXXX-XXXXX

Afterwards, activate Windows by entering:

slmgr /ato

In most cases, Windows completes activation within seconds. However, you should verify the activation status if any errors appear.


Method 3: Activate Windows Server 2019 Standard Using PowerShell

In addition, PowerShell provides another efficient activation option.

First, launch PowerShell as Administrator.
Next, run the following commands:

slmgr.vbs /ipk XXXXX-XXXXX-XXXXX-XXXXX-XXXXX
slmgr.vbs /ato

As a result, this method works well for automation and scripted deployments.


How to Check Activation Status

After activation, confirm the license status to ensure Windows activated correctly.

CommandPurpose
slmgr /xprShows whether activation is permanent
slmgr /dliDisplays basic license details
slmgr /dlvShows detailed activation information

By checking these values, you can quickly confirm the server’s activation state.


Common Windows Server 2019 Activation Errors and Fixes

Sometimes, Windows fails to activate due to configuration or licensing problems. In these situations, error codes point directly to the issue.

Error CodeCauseSolution
0xC004F050Invalid product keyVerify the key and edition
0xC004F074KMS server unavailableCheck network or KMS settings
0x803F7001License not detectedInstall the correct edition
0xC004C008Product key already usedContact your key provider

Therefore, identifying the correct error code speeds up troubleshooting.


Convert Windows Server 2019 from Evaluation to Standard

In some cases, activation fails because the server still runs in Evaluation mode. Fortunately, you can convert it easily.

First, check the current edition:

DISM /online /Get-CurrentEdition

Then, convert the system to Standard:

DISM /online /Set-Edition:ServerStandard /ProductKey:XXXXX-XXXXX-XXXXX-XXXXX-XXXXX /AcceptEula

After the conversion, restart the server and activate Windows normally.